Where's my Voi scooter: [4] Hosting the project on the cloud with a guild on how to set up a VPS
![Where's my Voi scooter: [4] Hosting the project on the cloud with a guild on how to set up a VPS](/_next/image?url=https%3A%2F%2Fcdn.hashnode.com%2Fres%2Fhashnode%2Fimage%2Funsplash%2F7nqYNG5OkZE%2Fupload%2Fv1654782581446%2F-9uNM1qIq.jpeg&w=3840&q=75)
I will host my Voi scooter location getter project on the cloud in this blog. While the word cloud may sound fancy, it is just someone else's computer.
Why cloud
The code needs to fetch data and store it 24/7. But I don't want to waste energy, also the LEDs on my desktop glow at night affecting my sleep. So I decided that I want a VPS (virtual private server). It doesn't use my electricity and uses less energy compared to a physical PC with the same specification because different virtual servers share the same energy-using hardware like power supply units and motherboards according to CloudVPS.com.
The other reason is I learned VPS back when I coded my Discord bot, and it is just another tool in my toolbar.
What VPS do I need
My program is simple, hence I only need a basic CPU and RAM, but I do need a bit more storage space as I need to store quite some data.
Finding a VPS provider
I searched online for simple and cheap VPS, which yielded a lot of results. However, a lot of websites look very sketchy, I don't trust them with my credit card details. Besides, most of the cheap providers ask you to pay upfront for a year or have an expensive set-up fee. I also tried to validate the providers by searching on Trustpilot, a website where you can find ratings and comments on a business to determine if you trust it, while some providers have a good score and comments, the comments just looks sketchy as if some bots generated them. To summarize, common VPS traps I found are:
Common VPS trap
- Automatic subscription: they try to get you to forget that you subscribed and charge you every month.
- Difficult to cancel: This is my number one fear, what if there isn't a simple way to cancel the subscription and it keeps charging me.
- Long contract term: They advertise a cheap price, but then you found out you have to enter a 1-year contract.
- Set-up fee: The price they advertise does not include the set-up fee.
- Sketchy website: The provider may not be trustworthy and may simply steal money from you.
- Fake rating: Although a website may have a good score on Trustpilot, the comments and rating may be fake.
Therefore I decided to stick with the one I used before, while not being the cheapest, they offer a reasonable service for a reasonable price. More importantly, I know I can easily cancel, and I can pay with Paypal, which stops them from automatically taking money from my bank account. They have to give me an invoice, and then I pay. I also marked down the date for next month on my calendar so I can remember to cancel if I need to.
Why don't I use a credit-based service
There are other providers which provided scalable services, like Digital Ocean, Microsoft Azure, AWS, and Google Cloud. The reason I don't use them is that I have heard too many stories about them charging a lot because the client making a mistake. With this cheap VPS, bandwidth is limited and data transfer is unlimited, so I will not be charged extra. If my program goes wrong and uses a lot of bandwidth or resources, it will just run out of resources, instead of the service scaling automatically and charging me a lot for it.
Setting up the VPS
I bought the VPS. I used Linux as the OS (operating system) as it is efficient and not bloated, and I choose Ubuntu because it is the superior distro. I was just kidding, I don't think any distro is superior, I use Ubuntu because I've used it before and it is my comfort pick.
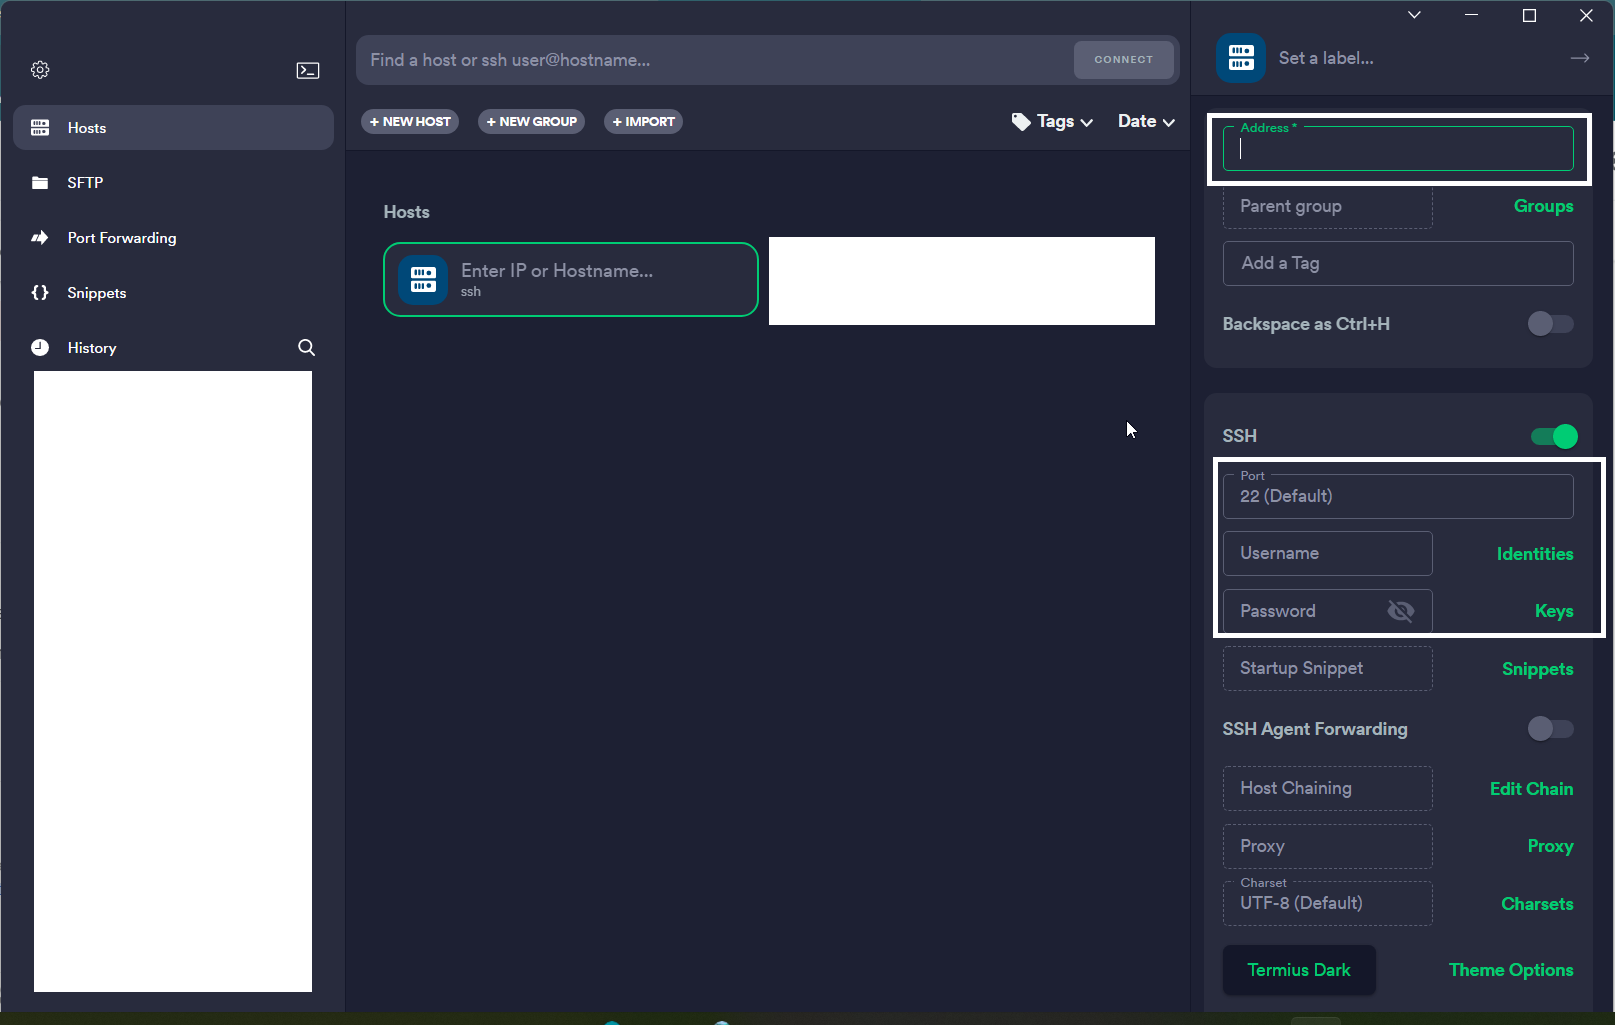
I got my credentials in my email, namely the IP (internet protocol) address, username and password. I use Termius as it has an intuitive UI (user interface) and is free for students via the Github student pack. I input the credentials, as long as 22 as the port as it is the default SSH (secure shell) port. Then connected.
I found my old notes on what to do when setting up a new VPS.
Updating the VPS
The VPS you just bought is in its default configuration, therefore you want to update it by doing these two commands.
sudo apt update
sudo apt upgrade
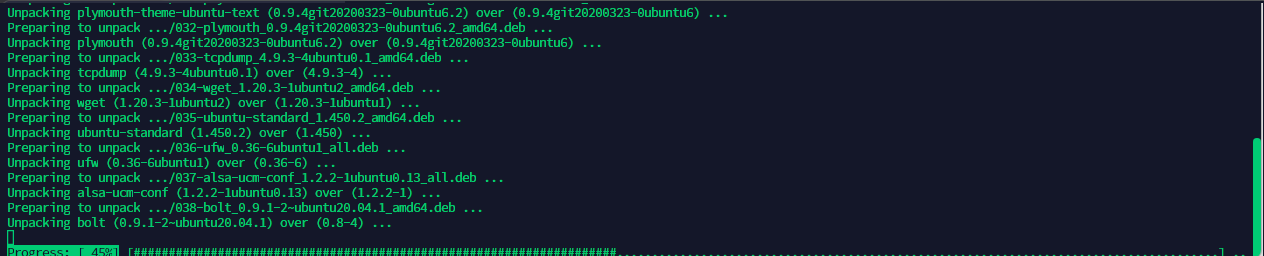
sudo means super user do, so it runs with greater permission. apt update updates the package list with the latest available versions, while apt upgrade actually upgrades and installs the latest versions of packages that are already installed according to LinuxHint.com.
What you will see when you are installing the updates.
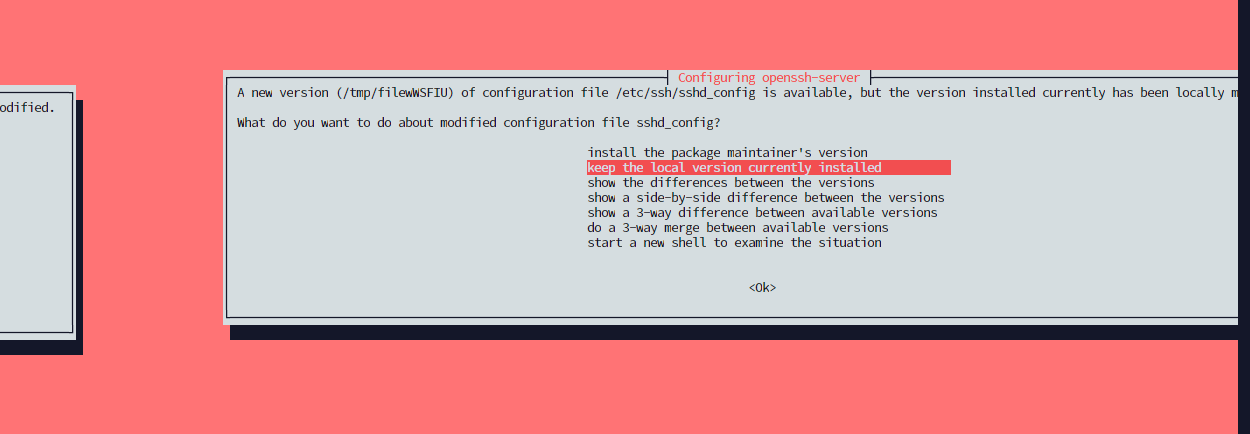
You may also get this red screen about the SSH configuration, don't panic, it is just saying there are two versions of it, I usually just keep the local version, hitting enter for OK.
Set up access control
Securing your VPS is important. A lot of people are running bots to attack random VPS servers. If you are not careful, you may fall victim to them. Like me, who has been hacked twice. I was planning to include the story here, but that would make this article too long, I will make a new blog talking about that and link it here when I finished.
Securing your VPS
The first thing to do is to remove the root login. With the root login, the person will gain complete system access. Since the username is always root and the access rights are unlimited, this account is the most valuable target for hackers according to Baeldung.com.
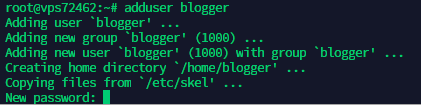
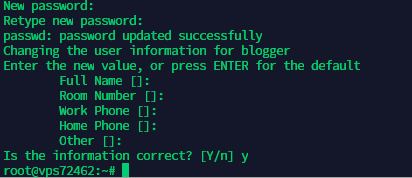
So we first add a new user and give it sudo access. Note that adding a user, you need to supply a password as well, I generated my 50 character password on PasswordsGenerator.net, for security measures.
adduser {name}
usermod -aG sudo {name}
Then, we want to disable root login, as well as change the SSH port, as people usually attack the default port 22, so changing it further decreases the chance of hackers getting access to your VPS.
We open the SSH configuration file in the nano file editor by
sudo nano /etc/ssh/sshd_config
Then you will see a wall of text, but the only two things you need to change is:
Portto475PermitRootLogintono

Installing Fail2Ban
At last, I will install a service called Fail2Ban, it scans log files and bans IPs that show the malicious signs -- too many password failures, seeking for exploits, etc.
sudo apt install fail2ban
As I use Ubuntu, I can just install and it will work, but for other Linux distributions, you will have to go to this website and see how to activate it.
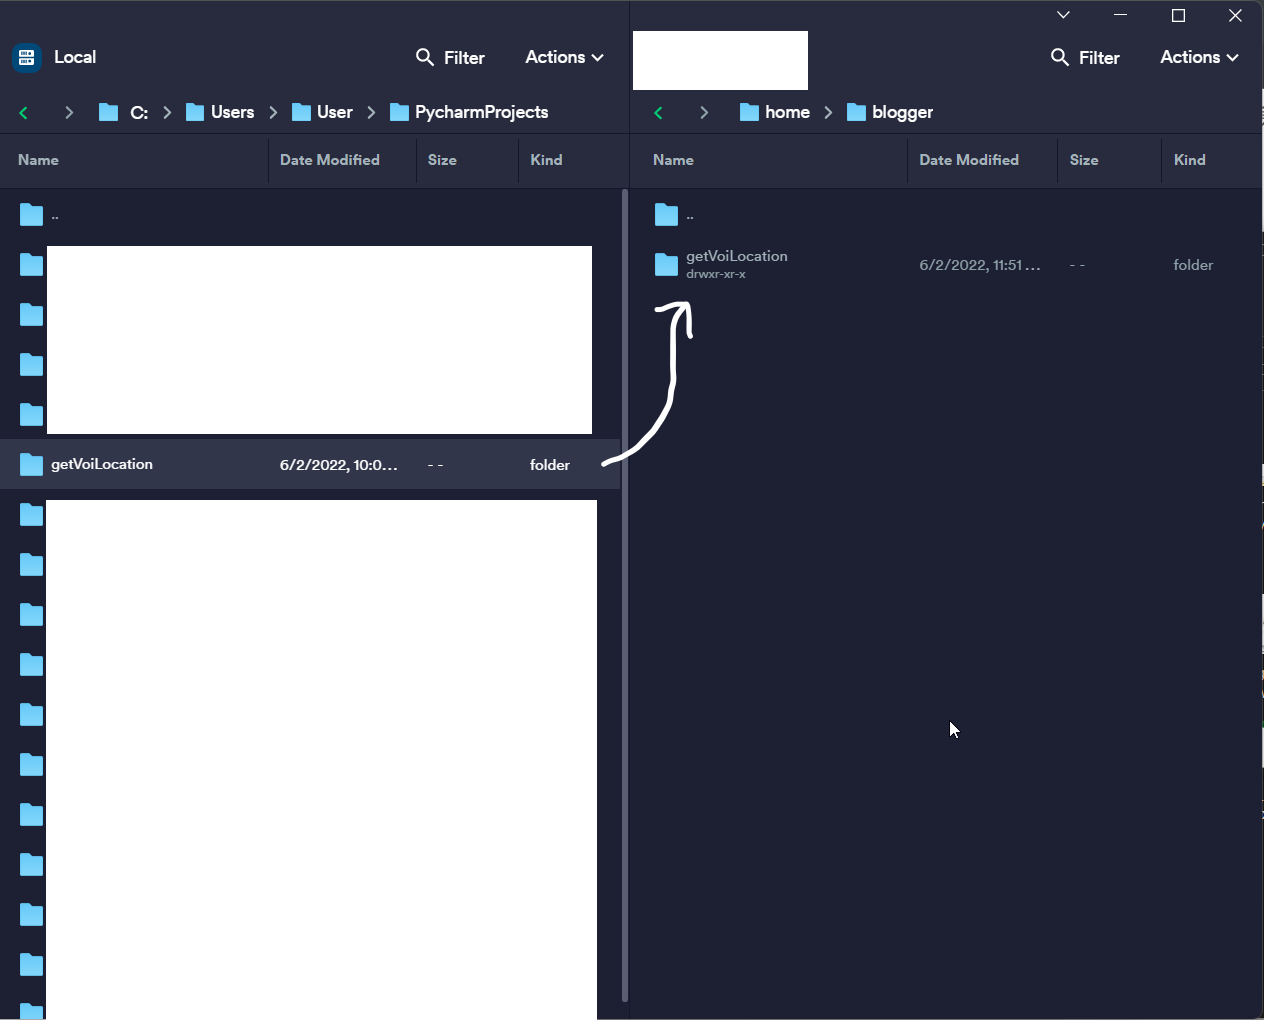
Transfering the script
I used the SFTP function in Termius to transfer the script, simple drag and drop.
Setting up the script
Congratulations, the VPS is finally ready to use, now I log out of root and log in with my new credentials. Then I run
screen
It creates a new screen, I do that because I am on a command-line interface, and only one thing can happen at a time. Think of it as Chrome tabs, I open a tab, do something, and then I can work on other tabs without affecting this tab. screen creates a new screen where I can work on things and can leave this screen to work on something else on other screens.
Then I go inside the correct folder and run the script
cd getVoiLocation
python3 main.py
now I edit my screen using ctrl+a ctrl+d. Note that ctrl+d disconnects the screen, we must do ctrl+a beforehand to keep the screen alive, if we don't do ctrl+a and only do ctrl+d, you will have killed the screen while disconnecting it.
What will I do in the future
With my script running, I can finally rest and let it run. In the next blog, I aim to use data analytics tools to analyse the data generated.
Reference
This article references sources using in-text hyperlinks to the original source. I do this because while I know and am able to use APA or IEEE referencing style, this article is informal, and I believe my way of referencing is more efficient and readable on a blog website.
![Focuster review: My experience as a student in summer [week 3]](/_next/image?url=https%3A%2F%2Fcdn.hashnode.com%2Fres%2Fhashnode%2Fimage%2Fupload%2Fv1693222238382%2F06452c01-14a3-423a-9311-83b9d82f6fcc.png&w=3840&q=75)
![Reclaim.AI review: My experience as a student in internship [week 2]](/_next/image?url=https%3A%2F%2Fcdn.hashnode.com%2Fres%2Fhashnode%2Fimage%2Fupload%2Fv1692385558997%2F5cd2253e-b50d-4d47-9aad-72807848b1a9.png&w=3840&q=75)
![Motion Review: My experience as a student in internship [week 1]](/_next/image?url=https%3A%2F%2Fcdn.hashnode.com%2Fres%2Fhashnode%2Fimage%2Fupload%2Fv1690840123756%2F5bdf844a-d728-430c-8d9b-b88b7b77c726.png&w=3840&q=75)
![Trialling Productivity Tools to Rescue My Time [Week 0]](/_next/image?url=https%3A%2F%2Fcdn.hashnode.com%2Fres%2Fhashnode%2Fimage%2Fupload%2Fv1690321356599%2F2f404dbe-3c2a-421b-903c-04d72c8febed.png&w=3840&q=75)